Whether you are a seasoned developer or just starting out, publishing your PHP website or script can be intimidating. How do I publish my site? It takes how long? How much does it cost? How do I install that PHP script I bought from CodeCanyon? These are all valid questions that plague developers and beginners alike. Fortunately, we have answered these questions so that you don’t have to! In this article, we will show you how to publish that PHP script you bought from CodeCanyon quick and easy!
1. Requirements to Publish PHP Website:
PHP Script from CodeCanyon or similar source How to Publish Your Website:
To publish your PHP website or script. You can use a content management system such as WordPress, you can use FTP to upload your files. In this article, we will show you the best method, which is to install on a VPS server.
You will need:
- Domain name
- A VPS server
2. Buy a Domain Name To Publish PHP Website
To publish your PHP script, you will need a domain name. You can choose to buy one from Godaddy, Namecheap, Hostgator, etc. If you already have a domain then that’s great.
3. Buy a VPS Server
To publish your PHP script, you will need a VPS server (Virtual Private Server). We recommend Contabo or Digital Ocean to host your website and install the scripts that you buy from CodeCanyon.
Cloudways does offer PHP hosting that simplifies PHP application deployment. You can get started for free.
What is a VPS Server?
A VPS server, also known as Virtual Private Server, is a virtual machine that has its own operating system and does not share the resources with any other users.
It is a hosting solution that allows you to run an independent copy of your website. It offers many benefits, such as flexibility, security, and control over the resources at all times; making it ideal for those who want to create their own dedicated server without having to hire technical staff or invest in infrastructure.
VPS vs. Shared Hosting
The primary difference between VPS and shared hosting is that while with shared hosting you are sharing a server with other users, in the case of VPS your server is isolated from all other users.
This gives you more control over your environment and allows for greater flexibility when it comes to installing software or making changes to your website. Additionally, VPS is a more secure option, as it offers better protection against malicious users.
So I recommend a VPS for installing PHP scripts as you definitely will require more resources as traffic increases to your site.
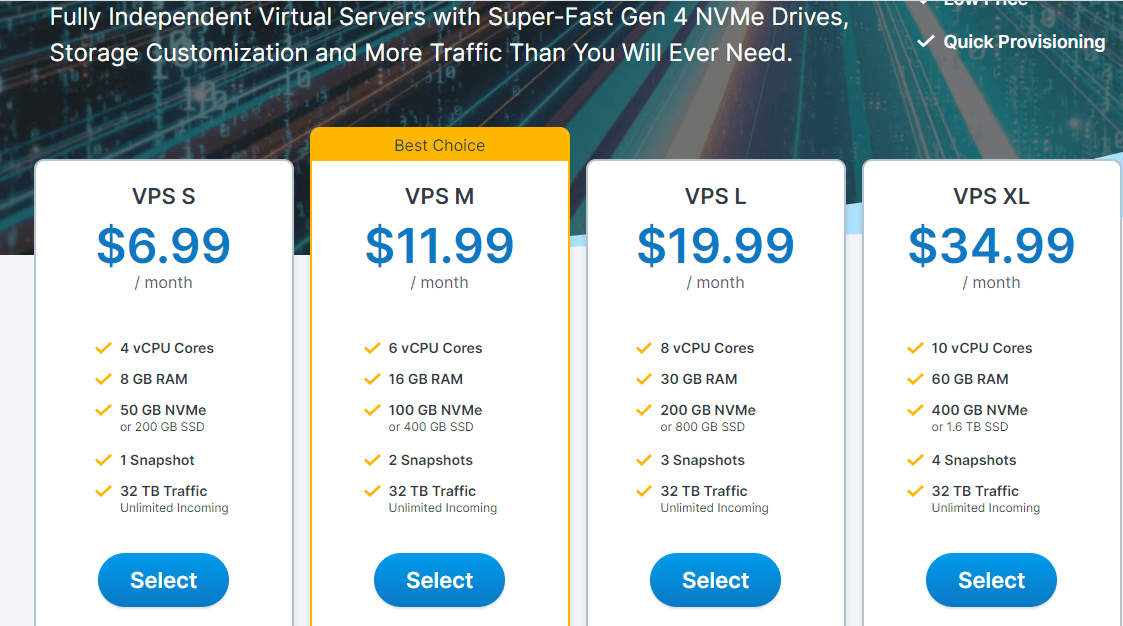
While shared hosting may be more affordable, Contabo VPS services start at just $6.99 per month. This is definitely the same price as most shared hosting providers, but you get your own server at that price.
Note: I’ll be using Contabo for this tutorial.
Get a Virtual Private Server (VPS) from Contabo
Contabo offers a wide range of VPS servers, with different Linux distributions and pre-installed software packages.
So you can get started quickly without worrying about the technical details. You can also select from SSD or HDD storage depending on your needs. Contabo’s user interface is simple to use, so even beginners will have no problem finding their way around it.
Sign Up for an account at contabo.com
In order to get started, you must first choose the VPS plan you require. I recommend you select the cheapest, then you can upgrade later if you need more resources.
Configure your VPS
Once you have selected a plan on the next screen, you can start configuring your VPS.
Among the options you’ll need to make for your new server are:
- Initial Contract Period: One month is the default. You have the option of signing up for a one-year or two-year contract.
- Data Center Region: It costs a little more to host servers outside of the European Union.
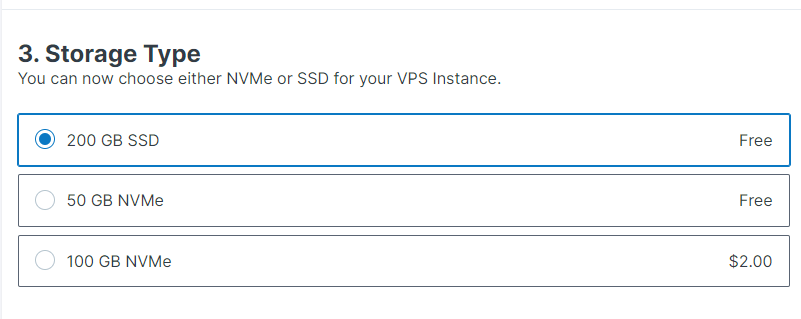
- Storage Type: On the storage type, I recommend you choose NVMe (50GB) as it is faster than SSD (200GB). If you require a lot of space go for SSD.
- Image: After your order has been finalized, you will be able to select an image from the customer control panel. Select Ubuntu 20.04
- Networking: Additional IP addresses cost $4 each. Additional IP addresses are available if needed. You also get 32TB outbound and Unlimited traffic inbound.
- Addons: All of them should be left as is. They may include more storage, server management (managed or unmanaged), server monitoring, and SSL encryption. Click on “Next”
On the next page, enter your details as an individual or business. Click on “Next” then enter your payment details. Review your order details. If satisfied, make a payment.
Note: Make sure to choose Ubuntu 20.04 and select LAMP which stands for Linux, Apache, MySQL, and PHP (in the Apps & Panels.)
The setup process is very simple and should take only a few minutes. After you confirm your order an email will be sent to you with details like those shown below.

4. Upload The Script Files
Now that you have a server, it’s time to upload the files. WinSCP is the application you’ll need to upload the files. You may get it for free by visiting this page and downloading it.
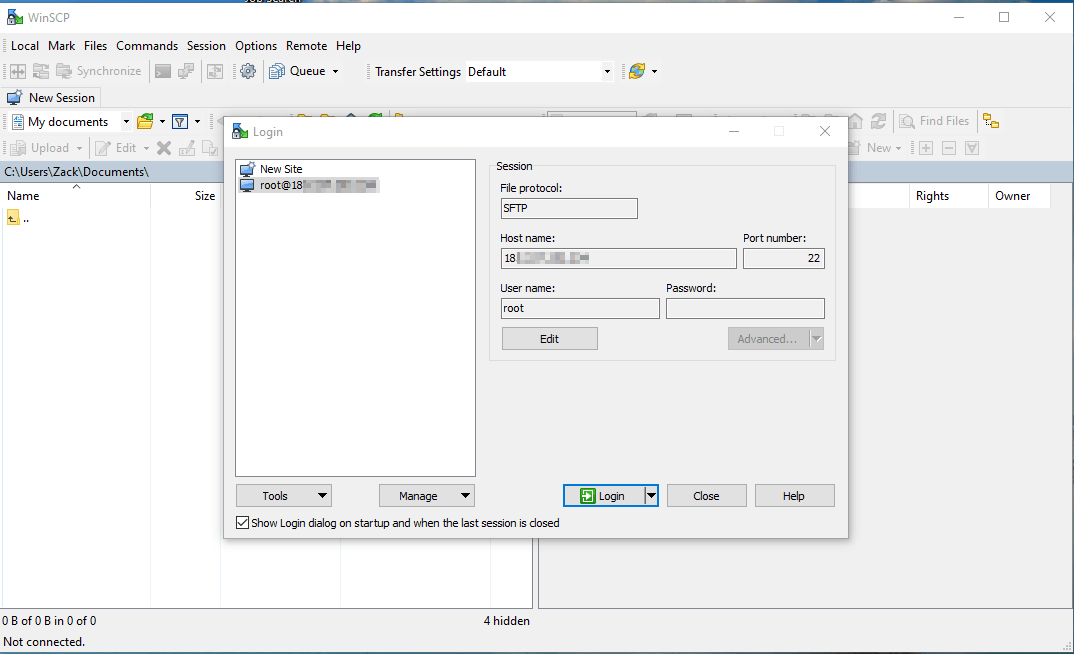
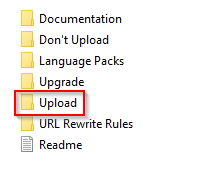
Access your VPS via SSH and connect using “root” as username with password sent in email. Extract the file you downloaded from CodeCanyon or any other source. Zip the “Upload” folder. After you are done zipping, upload the PHP files to the VPS server to this path: “/var/www/html”
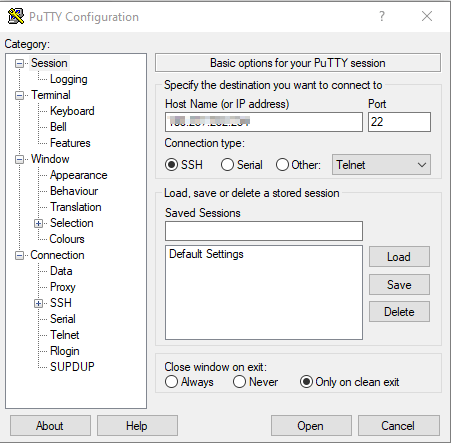
After upload, you will need to extract the file. Putty or any other SSH client can be used to connect to your VPS server and install the unzip utility.
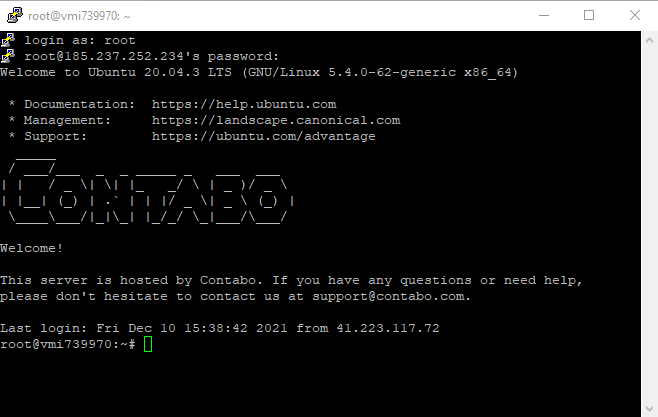
Just launch Putty and type in the server’s IP address or name, then press Open. To log in, type “root” as the user name and the password you received via email. Please note that putty will not display the password while you’re inputting it.
Use the following commands to install the unzip utility:
sudo apt-get install unzip
After installation, clear the screen using the following command:
clear
Change directory to /var/www/html using the following command:
cd /var/www/html
Unzip the file using the command below:
unzip YOURFILENAME*.zip
When you are done, go to WinSCP, open the upload folder, copy its contents, and paste them into the upper directory. Delete the upload folder and the upload.zip file after you are done copying. Do not delete the “uploads” folder, please.
5. Create a MySQL Database
Now that the files are uploaded, you need to create a MySQL database. The majority of PHP scripts and apps require a MySQL database. Now that we know this, let’s go ahead and create one.
Use putty or any other SSH client to connect to the VPS. As part of the LAMP Stack, we already have MySQL installed, but we still need to build a database for our application and a user.
To get started, type the following command to log into the MySQL root (administrator) account:
mysql -u root -p
Enter the root password when requested, and you’ll be good to go.
The first step is to build a separate database for your PHP program. Here we will create a “TestDb”. Run this command to create a database:
CREATE DATABASE TestDb DEFAULT CHARACTER SET utf8 COLLATE utf8_unicode_ci;
Create a new MySQL user account for the purpose of accessing and manipulating our new database.
In the next step, we’ll establish an account for this user, assign them a password, and provide them access to the database we built earlier. This can be accomplished by entering the following command.
Your database user’s password should be a strong one:
CREATE USER 'DbUser'@'localhost' IDENTIFIED BY 'enter_a_custom_password_here';
GRANT ALL ON TestDb.* TO ‘DbUser’@’localhost’;
We need to flush the privileges so that the current instance of MySQL is aware of our recent changes:
FLUSH PRIVILEGES;
You can exit out of MYSQL By typing
EXIT;
6. Connect Domain with VPS
Here I am going to use Namecheap. After purchasing your domain, it’s time to connect the domain to your VPS. The process might be slightly different with other domain providers. Add an A record pointing to your VPS IP address.
This tutorial is for Namecheap:
7. Installing PHP Modules (optional)
In order to run some PHP applications, your server will need to have a few more PHP modules installed. This is usually mentioned in the documentation.
In order to add additional PHP modules: Run the following commands in Putty:
sudo apt install php-curl
sudo apt install php-mbstring
sudo apt install php-example
Use the following command to restart apache:
sudo service apache2 restart
8. Set Up Apache Virtual Host to Publish PHP Website
Now that our server is ready to go, we need to set up Apache virtual hosts. These will allow us to run more than one website off of our VPS.
To get started, open WinSCP and navigate to directory: /etc/apache2/sites-available/
Create a new file and name it “mypersonaldomain.conf.” paying attention to replacing mypersonaldomain.conf with your domain name.
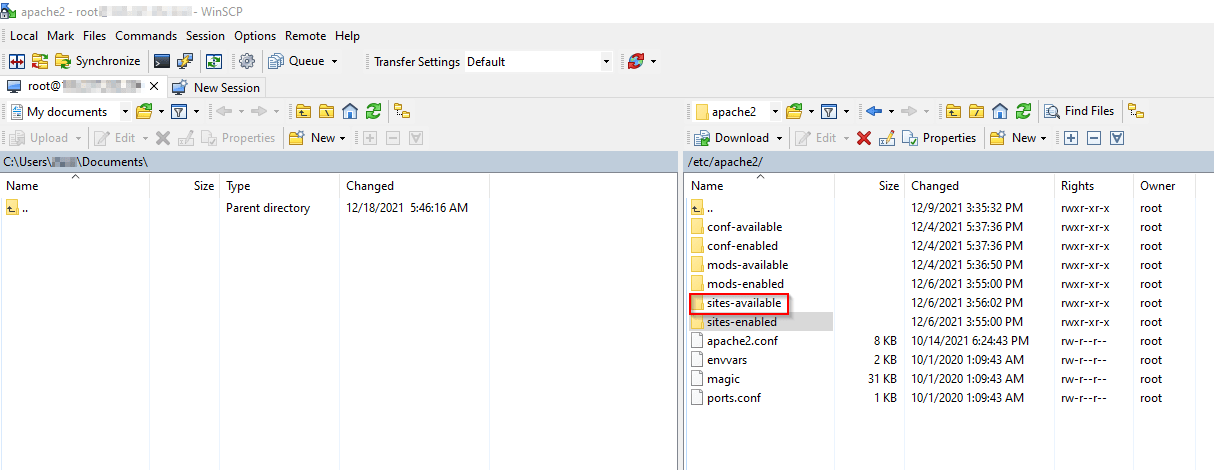
Open mypersonaldomain.conf then copy and paste the content below into the file and save.
<VirtualHost *:80>
     ServerAdmin mypersonaldomain.com
     DocumentRoot /var/www/html
     ServerName mypersonaldomain.com
     ServerAlias mypersonaldomain.com


     <Directory /var/www/html/>
        Options +FollowSymlinks
        AllowOverride All
        Require all granted
     </Directory>


     ErrorLog ${APACHE_LOG_DIR}/error.log
     CustomLog ${APACHE_LOG_DIR}/access.log combined


</VirtualHost>
If you create your own mypersonaldomain.conf file rather than editing the default.conf, then you have to enable the new site and disable the old one:
Run the following commands:
sudo a2ensite mypersonaldomain.conf
sudo a2dissite 000-default.conf

Test if the synatx is good:

sudo apache2ctl configtest

You should see something like:
Output
Syntax OK

Run the commad below;

sudo a2enmod rewrite

Restart Apache to apply the changes and have the web server use your configuration file.

sudo systemctl restart apache2.service
9. Connect to MySQL Database.
Open your browser and visit the “index.php” page in your web browser where you have uploaded the files e.g. http://www.example.com/index.php.
On the directory & Permissions section if you have problems with the permissions make the files rewritable. Connect to the VPS with WinSCP and change the permissions to 0777. This is only for the AtoZ SEO app that we using as a demo.
You will see a setup completion wizard like the one shown below:
Provide the necessary information i.e., database-host (type in localhost) , database-name, database-username and database-password. In our example, the database name is TestDb and the user is DBUser.
10. How to Publish PHP Website : Cronjobs
What are cronjobs?
Cronjobs can perform a variety of tasks. The most common use for cron is to schedule the execution of scripts and programs on your server or VPS.
Setup cronjobs
In order to set up cronjobs, you must add all of the jobs that are needed to the server first. Your script may require cronjobs, therefore if you purchased a script from Code Canyon, the developer should give these to you as well. Setting up cron jobs is an important step in the installation. It helps to generate sitemap, database backups and clean up temporary directory regularly.
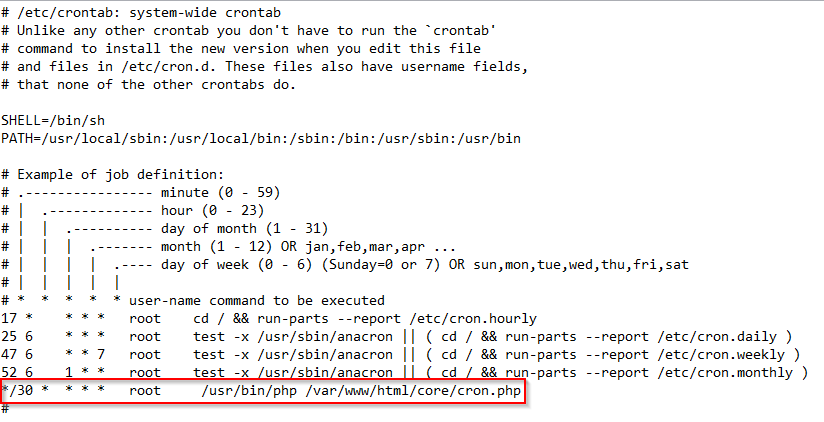
Use WinSCP, got to /etc and open crontab enter your cron jobs here. cronjobs are mostly found in the documentation.
11. Install an SSL Certificate
Let’s Encrypt is a free, automated, and open certificate authority (CA), run for the public’s benefit. It is a service provided by the Internet Security Research Group (ISRG).
In order to install an SSL Certificate from Lets Encrypt, you will need shell access to your VPS. Use Putty to connect to the VPS
First, add the repository to install Certbot:
sudo add-apt-repository ppa:certbot/certbot
Then update the package with this command:
sudo apt-get update
Install Certbot’s Apache package:
sudo apt install python-certbot-apache
Set Up the SSL Certificate
Run the following command change (MYDOMAINNAME) to your domain name.
sudo certbot --apache -d MYDOMAINNAME
You will be prompted to enter an email address for lost key recovery and alerts, and you will be able to enable both http and https access or force all queries to divert to https. Select https. Unencrypted HTTP traffic should be avoided at all costs unless you have a compelling need for it.
Conclusion: How to Publish PHP Website
In this tutorial, you have learned how to install and set up a PHP website on a VPS. You also installed an SSL Certificate from Lets Encrypt and setup cronjobs for your website.
Feel free to ask any questions in the comments below.