If you regularly work with PDF documents, you have probably used online PDF tools to merge, split, compress, convert, sign, or manipulate PDF files.
The problem with many online PDF services is that you often have to upload your documents to someone else’s server.
BentoPDF offers an interesting alternative.
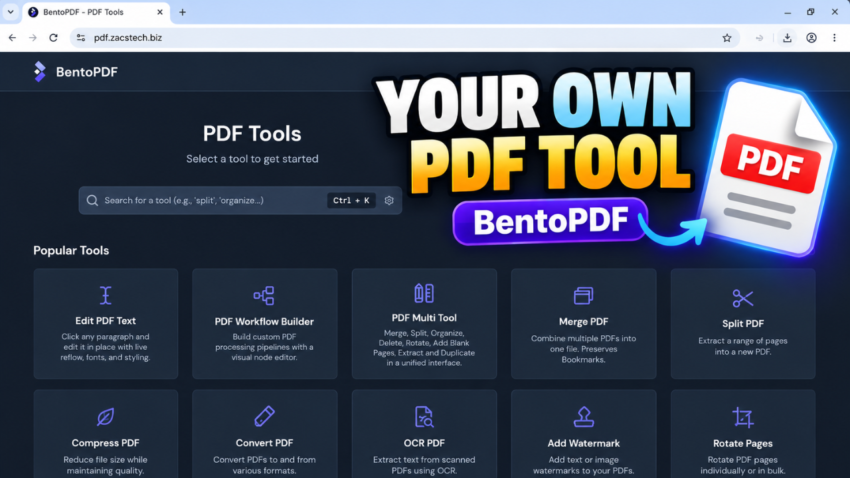
BentoPDF is a privacy-focused, self-hosted PDF toolkit with a large collection of PDF tools. Its client-side architecture means that PDF processing is primarily performed inside the user’s browser using JavaScript and WebAssembly.
In this tutorial, we’ll install BentoPDF on a DigitalOcean VPS using Docker, put it behind Nginx, enable HTTPS with Let’s Encrypt, and add username and password authentication.
By the end, we’ll have:
https://pdf.zacstech.bizrunning our own BentoPDF installation.
What Is BentoPDF?
BentoPDF is a web-based PDF toolkit that provides tools for working with PDF documents.
Depending on the version, the toolkit includes tools for tasks such as:
- Merge PDF files
- Split PDF files
- Compress PDF files
- Convert PDF files
- Extract pages
- Rotate pages
- Add watermarks
- Add page numbers
- OCR
- Edit PDF documents
- Organize PDF pages
- Sign PDF documents
- Encrypt and decrypt PDFs
- Convert documents to PDF
One of the main reasons to self-host BentoPDF is privacy.
Rather than relying on a third-party website to process your documents, you can run the BentoPDF application on your own infrastructure.
How does BentoPDF process PDFs?
BentoPDF uses browser-based technologies such as JavaScript and WebAssembly.
This means the VPS primarily serves the BentoPDF application. The actual PDF processing can take place in the user’s browser.
This is different from a traditional PDF-processing service where you upload a document to a server, the server processes it, and then you download the result.
What We Are Going to Build
Our final setup will look like this:
                    Internet
                       │
                       ▼
              pdf.zacstech.biz
                       │
                       ▼
                  HTTPS / 443
                       │
                       ▼
                    Nginx
                       │
                 Basic Auth
                       │
                       ▼
              127.0.0.1:3000
                       │
                       ▼
             BentoPDF Docker
The BentoPDF container will not be directly exposed to the Internet.
Instead, Docker will bind BentoPDF to:
127.0.0.1:3000Nginx will handle public HTTPS access.
Requirements
For this tutorial you will need:
- A DigitalOcean account
- An Ubuntu VPS
- A domain name
- Docker
- Docker Compose
- Nginx
- A DNS A record
- A Let’s Encrypt SSL certificate
For this demonstration, I used:
Operating System: Ubuntu 24.04 LTS
Domain: zacstech.biz
BentoPDF subdomain: pdf.zacstech.biz
You can use any domain and subdomain you want.
For example:
pdf.example.com
tools.example.com
bentopdf.example.com
Step 1 — Create a DigitalOcean Droplet
Log in to DigitalOcean and create a new Droplet.
For the operating system, select:
Ubuntu 24.04 LTSFor a small personal or demonstration installation, BentoPDF does not require a particularly powerful VPS because the PDF processing is primarily performed in the browser.
Once the Droplet has been created, note its public IP address.
For example:
123.123.123.123Connect to the server using SSH:
ssh root@YOUR_DROPLET_IPFor example:
ssh root@123.123.123.123Step 2 — Update Ubuntu
Before installing Docker, update the operating system:
apt update && apt upgrade -yThen install some required utilities:
apt install -y curl git nginx ufwStep 3 — Install Docker
Install Docker using:
curl -fsSL https://get.docker.com | shCheck that Docker was installed:
docker --versionYou should get output similar to:
Docker version 29.x.xNow check Docker Compose:
docker compose versionYou should see the installed Compose version.
Step 4 — Create a Directory for BentoPDF
I prefer keeping Docker applications in /opt.
Create a directory for BentoPDF:
mkdir -p /opt/bentopdfEnter the directory:
cd /opt/bentopdfCheck your current directory:
pwdYou should see:
/opt/bentopdfStep 5 — Create the Docker Compose File
Create the Docker Compose configuration:
nano docker-compose.ymlPaste the following:
services:
  bentopdf:
    image: ghcr.io/alam00000/bentopdf-simple:latest
    container_name: bentopdf
    ports:
      - "127.0.0.1:3000:8080"
    restart: unless-stopped
Save the file:
Ctrl + O
Enter
Ctrl + X
Why are we using 127.0.0.1?
Notice this:
- "127.0.0.1:3000:8080"We’re deliberately binding BentoPDF to localhost.
This means BentoPDF isn’t directly accessible from the Internet through port 3000.
Instead:
Internet
   ↓
Nginx
   ↓
127.0.0.1:3000
   ↓
BentoPDF
This is preferable to exposing port 3000 publicly.
Step 6 — Start BentoPDF
Start the container:
docker compose up -dDocker will download the BentoPDF image and start the container.
Check that it is running:
docker psYou should see something similar to:
CONTAINER ID   IMAGE                                      STATUS
xxxxxxxx       ghcr.io/alam00000/bentopdf-simple:latest Up ...
You can also check the logs:
docker logs bentopdfStep 7 — Test BentoPDF Locally
Before configuring the domain, test BentoPDF directly from the server:
curl http://127.0.0.1:3000If BentoPDF is running correctly, you should receive HTML output.
At this point the application is running.
However, we don’t want users accessing it directly through port 3000.
That’s where Nginx comes in.
Step 8 — Configure Your Domain
Now go to the DNS management panel for your domain.
Create an A record for your BentoPDF subdomain.
For example:
Type: A
Name: pdf
Value: YOUR-DROPLET-IP
If your Droplet IP is:
123.123.123.123your DNS record would be:
pdf.zacstech.biz → 123.123.123.123You can check whether DNS is working with:
dig +short pdf.zacstech.bizIf dig isn’t installed:
apt install -y dnsutilsThen run:
dig +short pdf.zacstech.bizIt should return your DigitalOcean IP address.
Step 9 — Configure the Firewall
We don’t need to expose port 3000.
We’ll allow SSH, HTTP and HTTPS:
ufw allow OpenSSHufw allow 80/tcpufw allow 443/tcpEnable UFW:
ufw enableCheck the firewall:
ufw statusYou should see ports such as:
22/tcp
80/tcp
443/tcp
There is no need to open port 3000.
Step 10 — Configure Nginx
Create an Nginx configuration:
nano /etc/nginx/sites-available/bentopdfFor the initial HTTP configuration, use:
server {
    listen 80;
    listen [::]:80;

    server_name pdf.zacstech.biz;

    location / {
        proxy_pass http://127.0.0.1:3000;

        proxy_http_version 1.1;

        proxy_set_header Host $host;
        proxy_set_header X-Real-IP $remote_addr;
        proxy_set_header X-Forwarded-For $proxy_add_x_forwarded_for;
        proxy_set_header X-Forwarded-Proto $scheme;

        proxy_set_header Upgrade $http_upgrade;
        proxy_set_header Connection "upgrade";

        proxy_read_timeout 300;
        proxy_send_timeout 300;
    }
}
Save the file.
Now enable the site:
ln -s /etc/nginx/sites-available/bentopdf /etc/nginx/sites-enabled/bentopdfRemove the default Nginx site:
rm -f /etc/nginx/sites-enabled/defaultTest the Nginx configuration:
nginx -tYou want:
syntax is ok
test is successful
Then reload Nginx:
systemctl reload nginxYou should now be able to visit:
http://pdf.zacstech.bizand see BentoPDF.
Step 11 — Enable HTTPS
We don’t want users accessing the application over plain HTTP.
Install Certbot:
apt install -y certbot python3-certbot-nginxRequest an SSL certificate:
certbot --nginx -d pdf.zacstech.bizCertbot will ask for your email address and the Let’s Encrypt terms.
When prompted about redirecting HTTP to HTTPS, choose the option to redirect.
Your website should now automatically redirect:
http://pdf.zacstech.bizto:
https://pdf.zacstech.bizOpen the HTTPS address in your browser:
https://pdf.zacstech.bizYou should see the BentoPDF interface with a valid HTTPS certificate.
Step 12 — Add Username and Password Protection
By default, BentoPDF does not provide a login system for this type of deployment.
If you’re running a private demonstration or internal installation, we can protect it using Nginx Basic Authentication.
First install the htpasswd utility:
apt install -y apache2-utilsDon’t worry about the Apache name
This does not mean we’re installing the Apache web server.
We are simply installing a package containing the htpasswd utility.
Our web server is still:
NginxCreate a user:
htpasswd -c /etc/nginx/.htpasswd demoYou’ll be asked to create a password.
The resulting password is stored as a hash rather than plain text.
Step 13 — Configure Nginx Authentication
Now edit the BentoPDF Nginx configuration:
nano /etc/nginx/sites-available/bentopdfYour final configuration should look similar to this:
server {
    listen 443 ssl;
    listen [::]:443 ssl;

    server_name pdf.zacstech.biz;

    ssl_certificate /etc/letsencrypt/live/pdf.zacstech.biz/fullchain.pem;
    ssl_certificate_key /etc/letsencrypt/live/pdf.zacstech.biz/privkey.pem;

    include /etc/letsencrypt/options-ssl-nginx.conf;
    ssl_dhparam /etc/letsencrypt/ssl-dhparams.pem;

    location / {
        auth_basic "BentoPDF Demo";
        auth_basic_user_file /etc/nginx/.htpasswd;

        proxy_pass http://127.0.0.1:3000;

        proxy_http_version 1.1;

        proxy_set_header Host $host;
        proxy_set_header X-Real-IP $remote_addr;
        proxy_set_header X-Forwarded-For $proxy_add_x_forwarded_for;
        proxy_set_header X-Forwarded-Proto $scheme;

        proxy_set_header Upgrade $http_upgrade;
        proxy_set_header Connection "upgrade";

        proxy_read_timeout 300;
        proxy_send_timeout 300;
    }
}

server {
    listen 80;
    listen [::]:80;

    server_name pdf.zacstech.biz;

    return 301 https://$host$request_uri;
}
Save the file.
Test Nginx:
nginx -tYou should see:
syntax is ok
test is successful
Then reload Nginx:
systemctl reload nginxStep 14 — Test the Login
Open:
https://pdf.zacstech.bizYou should now get a username and password prompt.
Enter the credentials created earlier:
Username: demo
Password: YOUR_PASSWORD
After authentication, BentoPDF should load normally.
You now have a protected BentoPDF installation.
Understanding the Final Setup
At this point, our infrastructure looks like this:
                    INTERNET
                       │
                       ▼
              pdf.zacstech.biz
                       │
                       ▼
                  HTTPS :443
                       │
                       ▼
                    NGINX
                       │
                 Basic Auth
                       │
                       ▼
              127.0.0.1:3000
                       │
                       ▼
             BentoPDF Docker
The Docker container itself listens internally on port:
8080Docker maps that to:
127.0.0.1:3000Nginx then proxies requests to that address.
This means we don’t need to expose BentoPDF’s Docker port directly to the Internet.
Check That Port 3000 Isn’t Public
You can verify this with:
ss -tulnp | grep 3000You should see something associated with:
127.0.0.1:3000rather than:
0.0.0.0:3000That’s an important security difference.
Testing BentoPDF
Now that the installation is complete, open the website and try some of the tools.
For example, you can use:
Merge PDF
Select multiple PDF files and combine them into a single document.
Split PDF
Extract specific pages from an existing PDF.
Compress PDF
Reduce the size of a PDF document.
OCR
Process scanned documents and extract text.
Add Watermark
Add text or an image watermark to a PDF.
Rotate Pages
Rotate individual pages or multiple pages.
The nice thing is that you can perform these operations directly from the browser.
Updating BentoPDF
One advantage of using Docker is that updating BentoPDF is straightforward.
First enter the BentoPDF directory:
cd /opt/bentopdfDownload the latest image:
docker compose pullThen recreate the container:
docker compose up -dCheck that the container is running:
docker psYou can also check the logs:
docker logs bentopdfRestarting BentoPDF
If you ever need to restart the container:
cd /opt/bentopdf
docker compose restart
To stop it:
docker compose downAnd to start it again:
docker compose up -dUseful Docker Commands
Here are some commands you’ll probably use when managing BentoPDF.
Check running containers
docker psView BentoPDF logs
docker logs bentopdfFollow the logs
docker logs -f bentopdfPress:
Ctrl + Cto stop following the logs.
Restart BentoPDF
docker compose restartDownload the latest image
docker compose pullUpdate BentoPDF
docker compose pull && docker compose up -dChecking Nginx
If something isn’t working, check Nginx:
systemctl status nginxCheck the configuration:
nginx -tView recent Nginx errors:
tail -f /var/log/nginx/error.logView access logs:
tail -f /var/log/nginx/access.logTroubleshooting
BentoPDF Isn’t Loading
First check the Docker container:
docker psIf the container isn’t running:
cd /opt/bentopdf
docker compose up -d
Then check:
docker logs bentopdfNginx Shows a 502 Bad Gateway
A 502 usually means Nginx cannot communicate with BentoPDF.
Check:
curl http://127.0.0.1:3000If that doesn’t return the BentoPDF application, check Docker:
docker psand:
docker logs bentopdfNginx Configuration Error
Always run:
nginx -tbefore reloading Nginx.
You should see:
syntax is ok
test is successful
If you see an error such as:
"listen" directive is not allowed hereit usually means that an Nginx listen directive has been placed outside its server {} block or there is an incorrectly placed closing }.
HTTPS Isn’t Working
Check whether Certbot has a certificate:
ls -la /etc/letsencrypt/live/pdf.zacstech.biz/You should see files including:
fullchain.pem
privkey.pem
You can also test certificate renewal:
certbot renew --dry-runAutomatic SSL Renewal
Let’s Encrypt certificates are short-lived, so automatic renewal is important.
Check the Certbot timer:
systemctl status certbot.timerYou can also perform a test renewal:
certbot renew --dry-runIf the simulated renewal succeeds, Certbot should be able to automatically renew your certificate when necessary.
Is BentoPDF Safe for Sensitive Documents?
This is one of the most important questions.
BentoPDF’s client-side architecture is designed so that PDF processing can happen inside the user’s browser rather than requiring the document to be uploaded to a remote processing server.
However, you should not automatically assume that every feature behaves identically.
If you’re dealing with highly confidential documents, understand exactly how the specific tool you are using works and verify the application’s current documentation and implementation.
Self-hosting also doesn’t automatically make a service secure.
You still need to:
- Keep Ubuntu updated
- Keep Docker updated
- Keep BentoPDF updated
- Use HTTPS
- Use strong passwords
- Secure SSH
- Use a firewall
- Monitor your server
- Avoid exposing unnecessary ports
Why We Used Nginx
You might wonder why we didn’t simply expose BentoPDF using:
http://YOUR-IP:3000We could have done that for a quick test.
However, Nginx gives us several advantages.
It provides:
- HTTPS termination
- Domain-based access
- Reverse proxying
- Authentication
- Security controls
- A cleaner public URL
- The ability to host additional services on the same VPS
Instead of:
123.123.123.123:3000we get:
https://pdf.zacstech.bizwhich is much cleaner.
Why Use Docker?
Docker makes deploying BentoPDF considerably easier.
Instead of manually installing all of BentoPDF’s dependencies, we can simply run the published Docker image:
ghcr.io/alam00000/bentopdf-simple:latestDocker also makes updates and restarts much easier.
Our entire deployment configuration is contained in:
/opt/bentopdf/docker-compose.ymlThat makes the application easier to move, maintain and recreate.
Security Recommendations
If you’re going to expose your BentoPDF installation publicly, I recommend doing more than just the Basic Authentication used in this demonstration.
At minimum:
Use a strong password
Don’t use:
demo123Use a long, unique password.
Keep Ubuntu updated
Run regularly:
apt update && apt upgradeKeep BentoPDF updated
cd /opt/bentopdf
docker compose pull
docker compose up -d
Don’t expose port 3000
Keep:
127.0.0.1:3000:8080rather than:
0.0.0.0:3000:8080Use HTTPS
Always use:
https://rather than plain HTTP.
Secure SSH
Use SSH keys where possible and avoid unnecessary exposure of SSH.
Final Result
We have now taken a fresh Ubuntu DigitalOcean VPS and turned it into a self-hosted PDF toolkit.
The final setup is:
DigitalOcean VPS
       │
       ▼
Ubuntu 24.04
       │
       ▼
Docker
       │
       ▼
BentoPDF
       │
       ▼
Nginx
       │
       ▼
Let's Encrypt HTTPS
       │
       ▼
Basic Authentication
       │
       ▼
pdf.zacstech.biz
The result is your own web-based PDF toolkit that you control.
You don’t need to rely on a third-party PDF website, and the client-side architecture of BentoPDF means PDF processing can happen directly in the user’s browser.
Commands Used in This Tutorial
For convenience, here are the main commands in one place.
Update Ubuntu
apt update && apt upgrade -yInstall dependencies
apt install -y curl git nginx ufwInstall Docker
curl -fsSL https://get.docker.com | shCreate BentoPDF directory
mkdir -p /opt/bentopdf
cd /opt/bentopdf
Start BentoPDF
docker compose up -dCheck Docker
docker psCheck BentoPDF
curl http://127.0.0.1:3000Install Certbot
apt install -y certbot python3-certbot-nginxGet SSL certificate
certbot --nginx -d pdf.zacstech.bizInstall Basic Authentication utility
apt install -y apache2-utilsCreate authentication user
htpasswd -c /etc/nginx/.htpasswd demoTest Nginx
nginx -tReload Nginx
systemctl reload nginxUpdate BentoPDF
cd /opt/bentopdf
docker compose pull
docker compose up -d
Test SSL renewal
certbot renew --dry-runConclusion
BentoPDF is an interesting project for anyone looking for a self-hosted alternative to online PDF tools.
With Docker, Nginx, HTTPS and a VPS, you can have your own instance running under a domain in relatively little time.
For a personal installation, home lab, small business, or demonstration environment, this is a particularly useful project to experiment with.
Have you tried BentoPDF or another self-hosted PDF solution? Let us know in the comments.
Suggested article title:
How to Self-Host BentoPDF on DigitalOcean with Docker, Nginx and HTTPS
Suggested URL slug:
self-host-bentopdf-digitalocean-dockerSuggested excerpt:
Learn how to self-host BentoPDF on a DigitalOcean VPS using Docker, Nginx and HTTPS. This step-by-step guide covers installation, domain configuration, SSL, Basic Authentication, updates and troubleshooting.